Registered Vendor Convergent Billing
Last updated: October 13, 2026
The RealPage Registered Vendor Program Convergent Billing Setup Guide
-
Create a Schedule
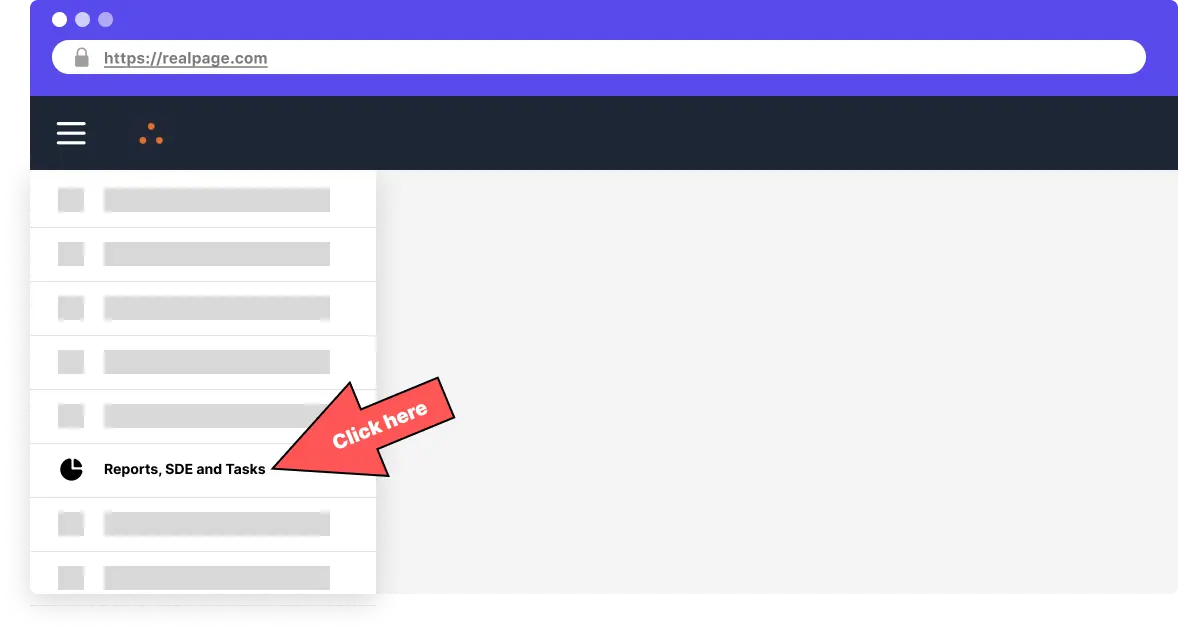
Go to the navigation menu at the upper left of Realpage OneSite and choose “Reports, SDE and Tasks”
-
Step 2
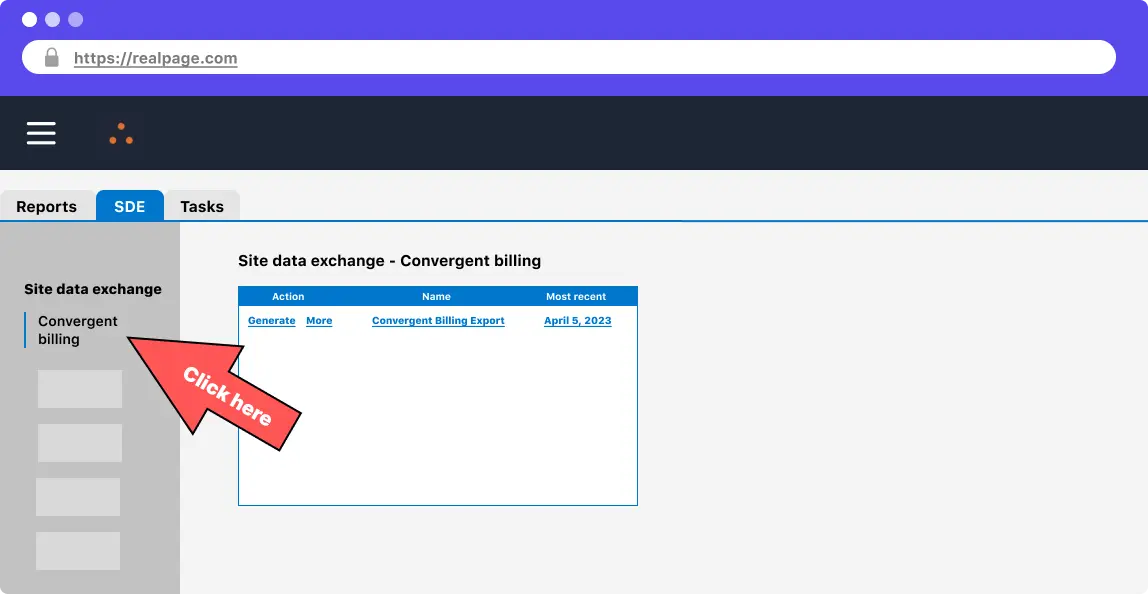
Choose the “SDE” tab and then the “Convergent Billing” tab under the “Site data exchange” section.
-
Step 3
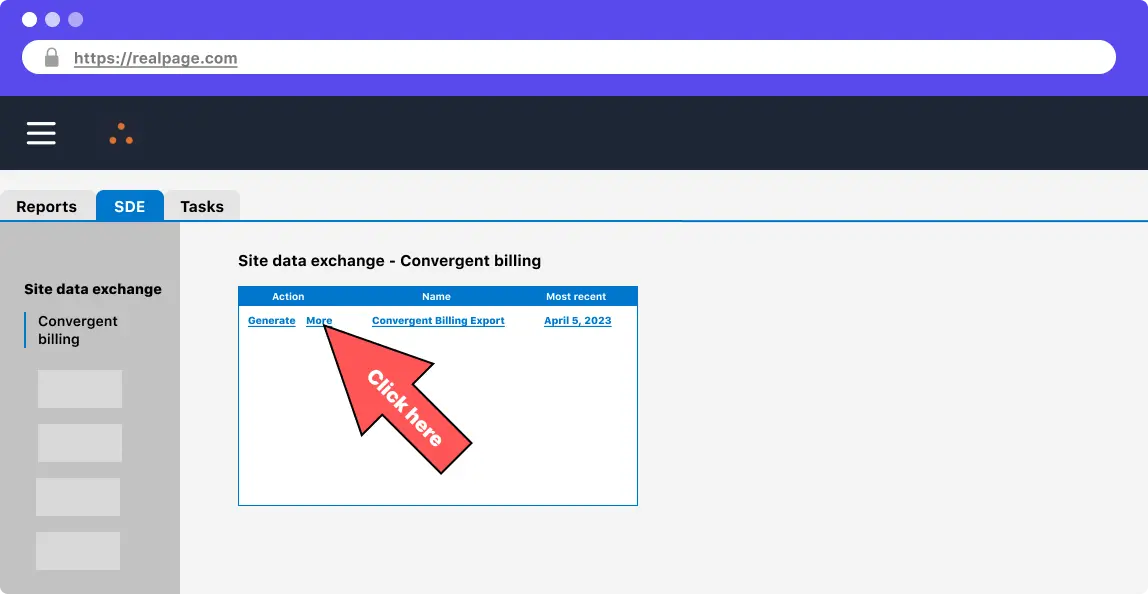
Select “More >” from on the “Convergent Billing Export”
-
Step 4
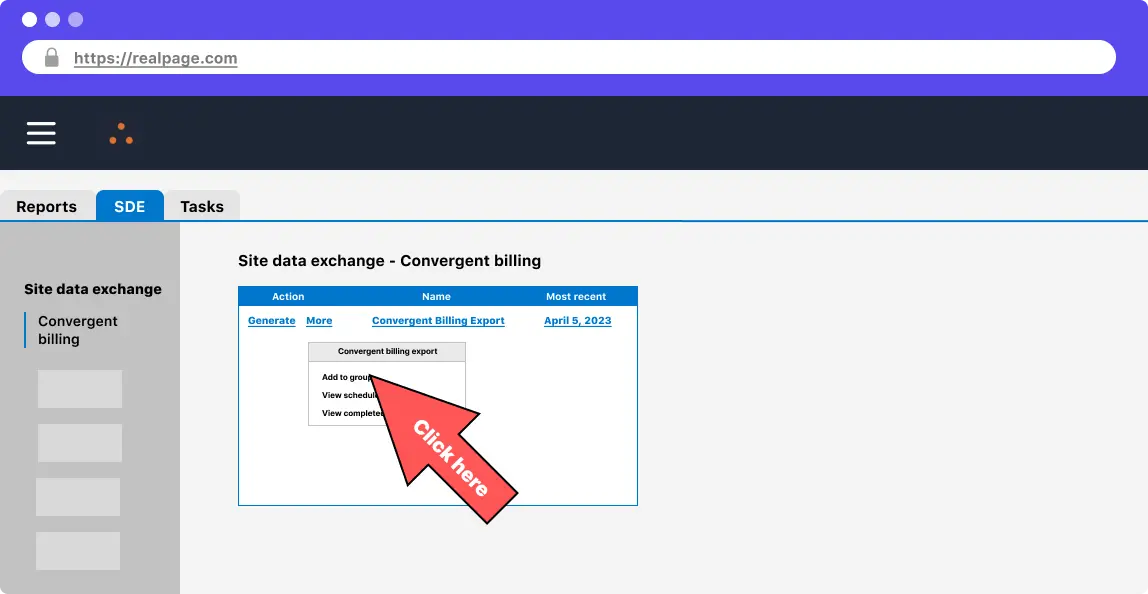
Choose “Add to group”
-
Step 5
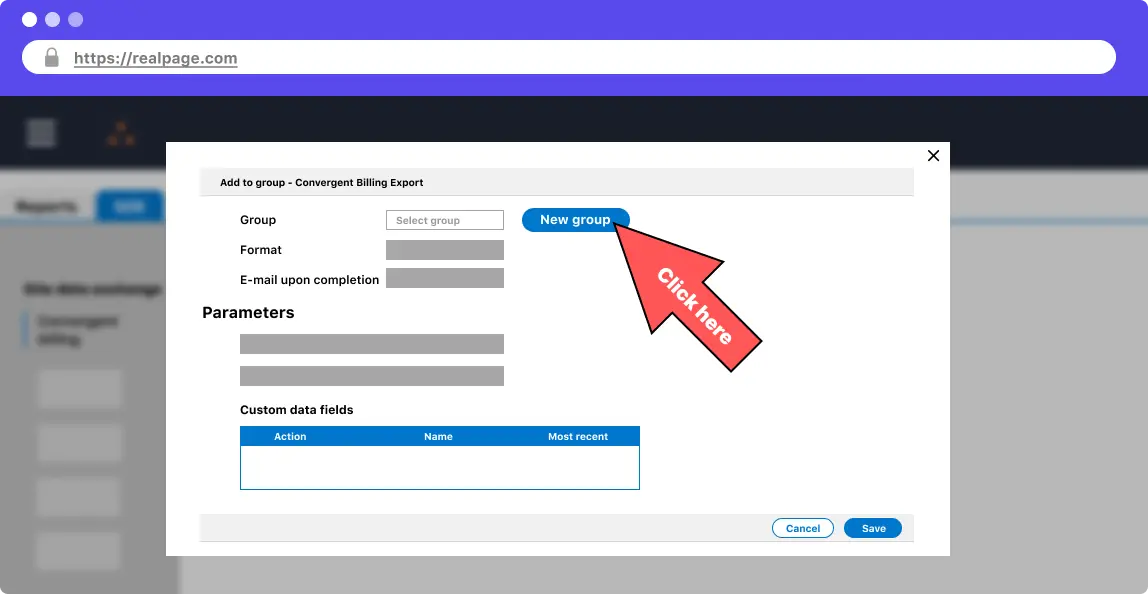
Click the “New group” button to create a new group to generate reports with
-
Step 6
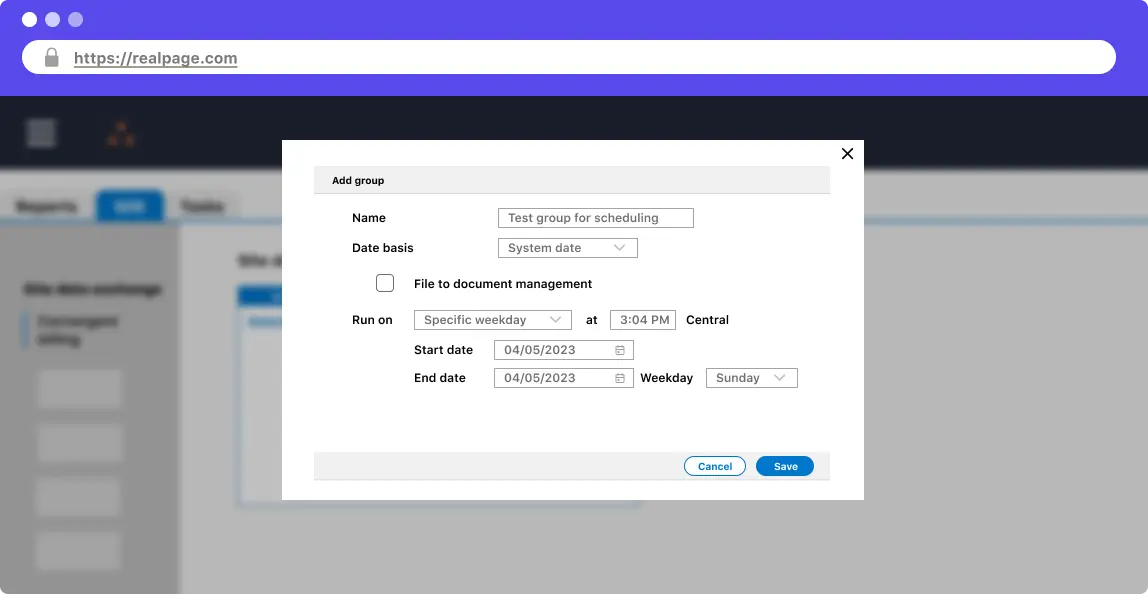
You'll have to name the group and select a schedule. We suggest selecting “System date” for the “Date basis” and generating on a scheduler that works for your team. Click “Save” when you're finished.
-
Step 7
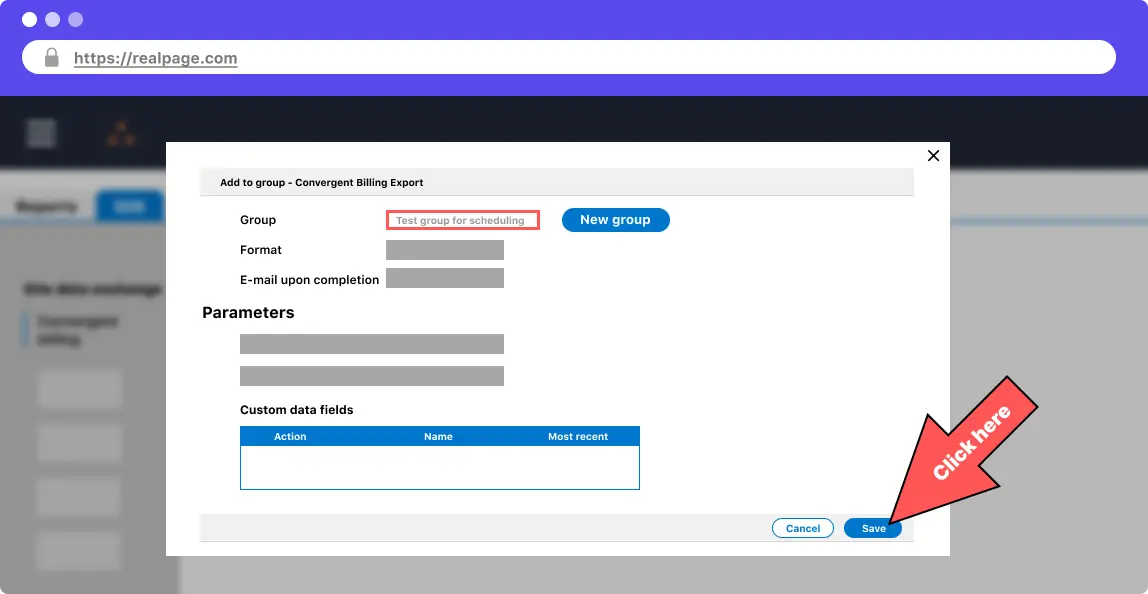
Your new group should be selected at the top of the modal. Choose the parameters that work best for you. If you're not sure, leave the default settings. Click save when you're done.
-
Step 8
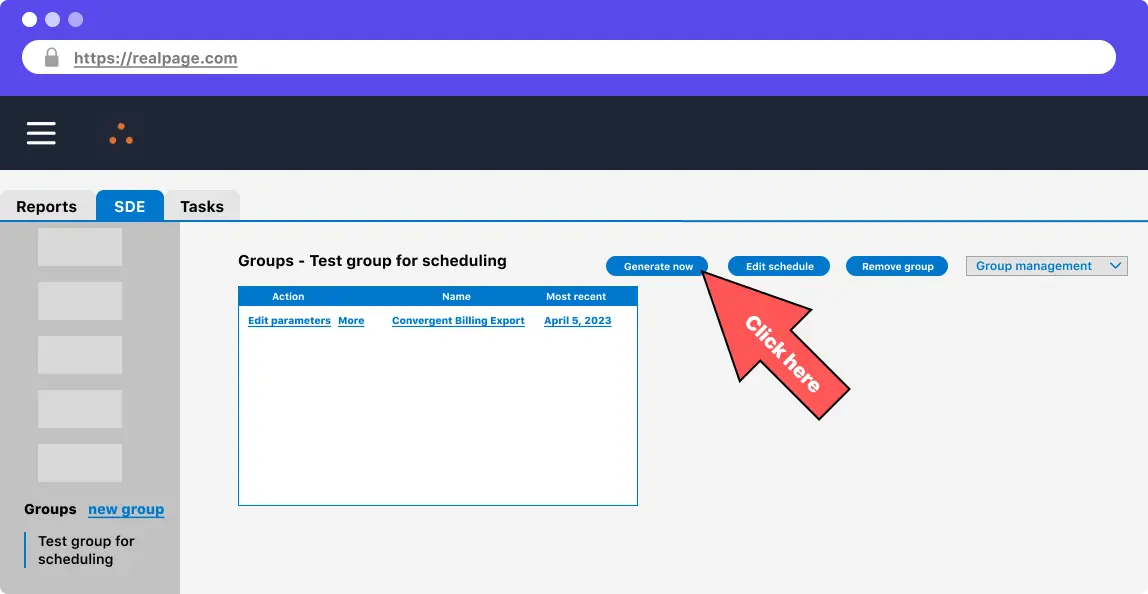
On the SDE tab, scroll all the way down to the “Groups” section and select your new or recently updated group. You should see the convergent billing export as part of this group. You can click the “Generate Now” button in the upper middle to test. Depending on the amount of data in your OneSite account, this can take a varying amount of time. If you have a significant amount of data, don't test this here and run it as part of your schedule off hours (as suggested by RealPage).
-
Enable FTP for SDE
The following procedures must be executed on Windows operating systems. RealPage currently maintains numerous interfaces that require Internet Explorer functionality, which is now accessed through Microsoft Edge's compatibility layer. RealPage provides documentation on how to do this on their main support page or view the instruction PDF directly by clicking here.
-
Step 10
You need to request FTP access from RealPage support. They will provide you with a hosted (S)FTP server. To request access, follow step one from this document.
This can take upwards of a week to get setup on RealPage's side.Implementation on RealPage's platform may require a minimum of 7 business days for complete system configuration.
-
Step 11
Submit a support request to have credentials created using this form
Support form responses
- Priority: P3 - Medium
- About you: Enter your contact info
- Product: Select OneSite L & R Conventional
- Operating System/Internet Browser: Make selections based on your computer
- Subject: Enter “Create RealPage SFTP for [Company Name]”
- Description: State the reason for the FTP site, such as "The SFTP servicer is to be used for third-party accounting data"
-
Step 12
Once submitted, allow up to 3 business days to complete the request.
Support will send you the following information:
- Host URL Name
- Login User Name
- Temporary Password with instructions to change the password
-
Step 13
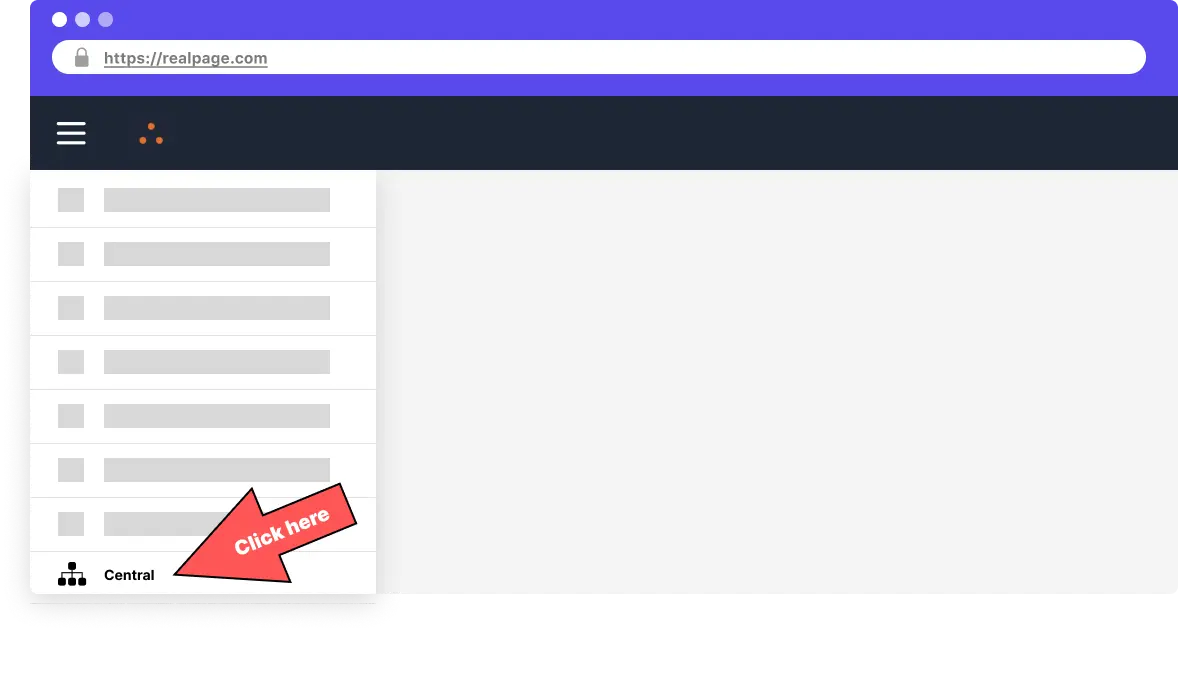
In the navigation bar, select the “Central” tab. If the central pane does not exist, contact RealPage support and let them know. Sometimes this needs to be enabled.
-
Step 14
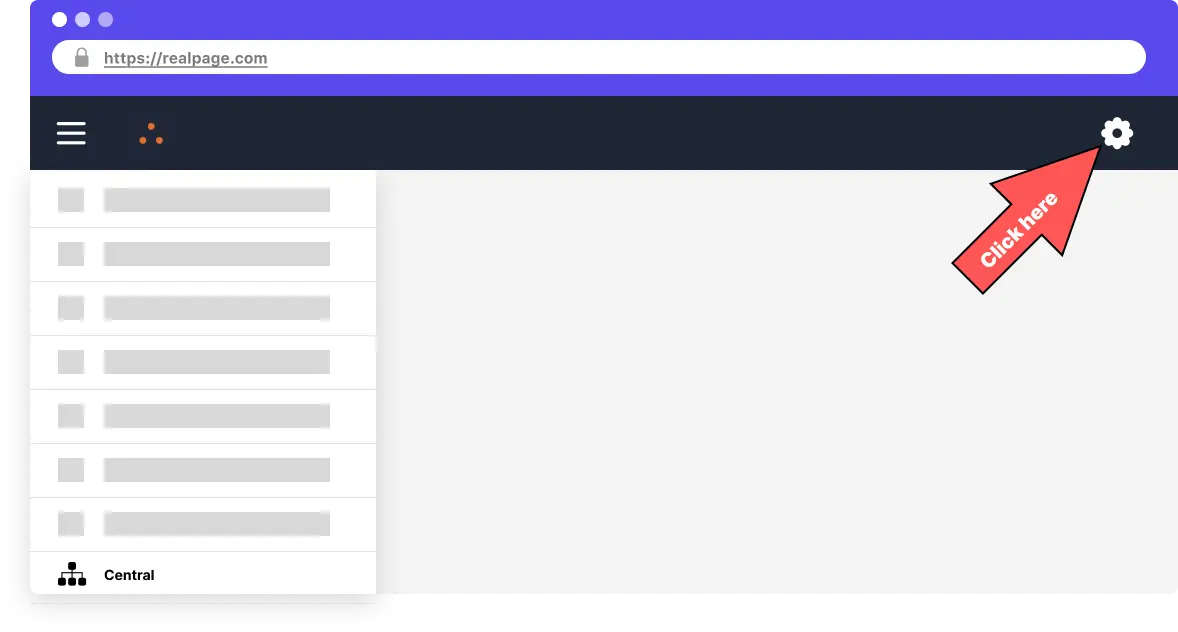
Select the gear icon on the upper right of the portal. If the gear icon does not take you to the settings page in the following step, contact RealPage support and let them know. Sometimes this needs to be enabled.
-
Step 15
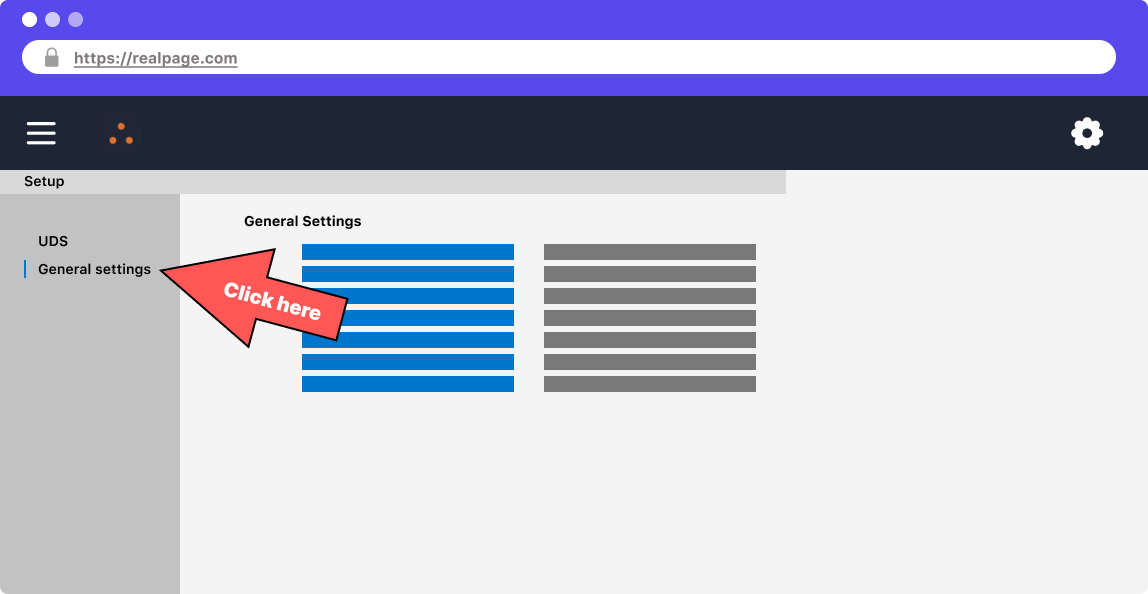
Select the “General settings” tab.
-
Step 16
Select “General information and company settings”
-
Step 17
Under “SDE settings, choose “FTP settings” and you'll be greeted with the setup modal above. Enter your FTP username and password given to you by RealPage. If the hostname doesn't match the one given to you by RealPage, check if you can connect to the shown hostname with your current FTP credentials as well. Oftentimes the credentials work on this host as well.
-
Step 18
Save all of the FTP settings.
-
Schedule FTP Download Job
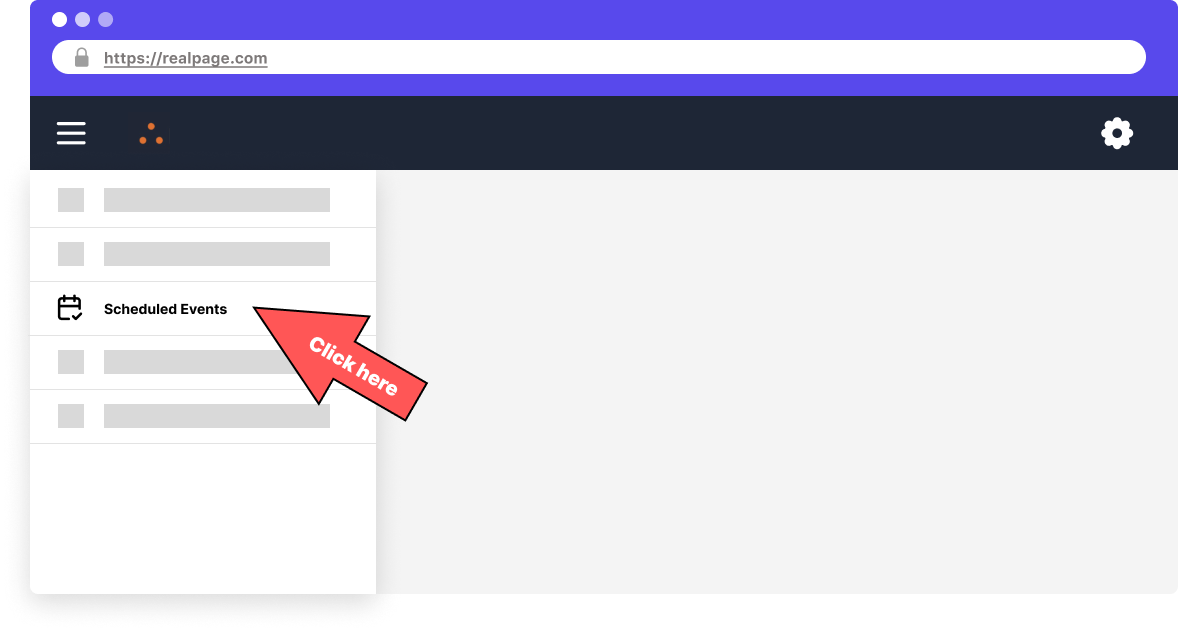
In the navigation bar, select the “Scheduled Events” tab
-
Step 20
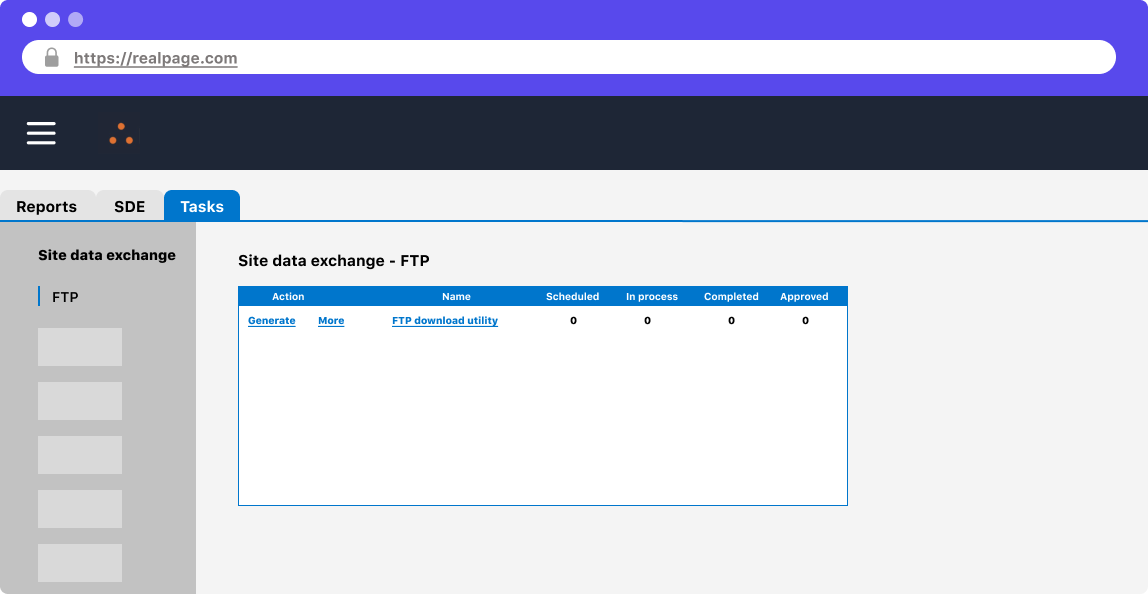
Go to the “Tasks” tab and under “Site data exchange”, choose the “FTP” item
-
Step 21
If the “FTP Download utility” item is not available on your page, contact RealPage support. Sometimes this needs to be enabled.
-
Step 22
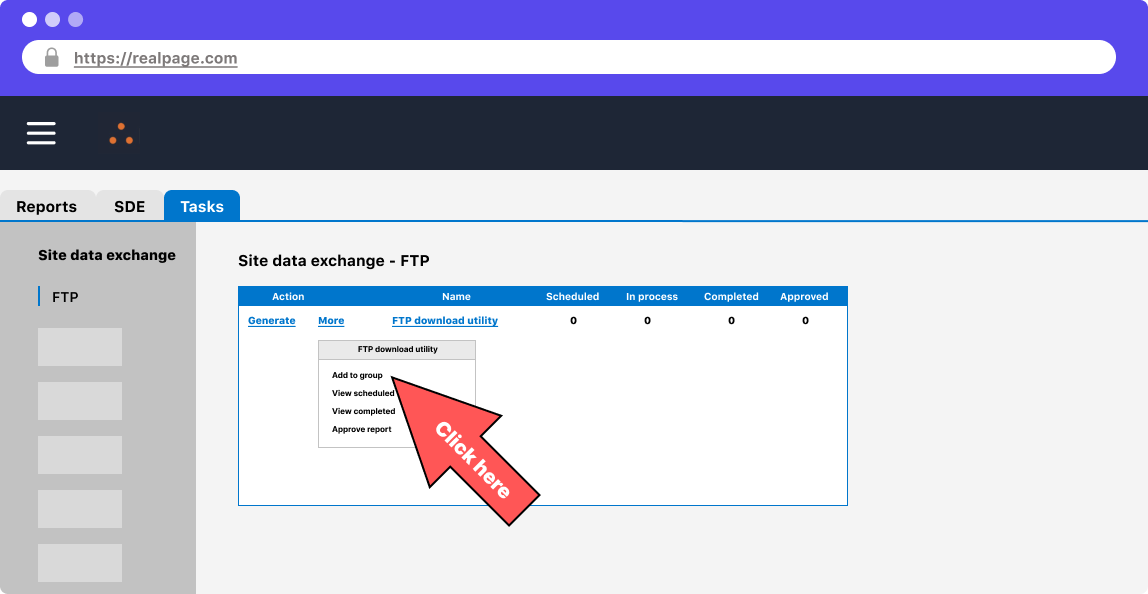
Click on the “More” text and choose “Add to group”
-
Step 23
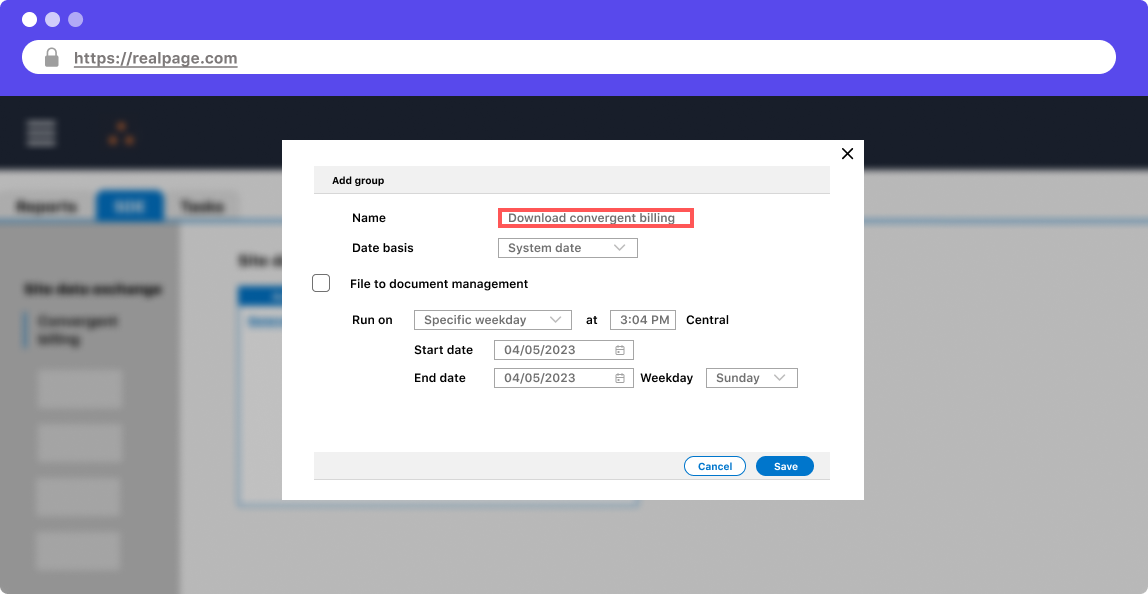
Create a new group with a schedule similar to the earlier convergent billing report from earlier.
-
Step 24
For the format, choose “Standard XML”
-
Step 25
Use the FTP settings from the company level (those are the ones we set earlier).
-
Step 26
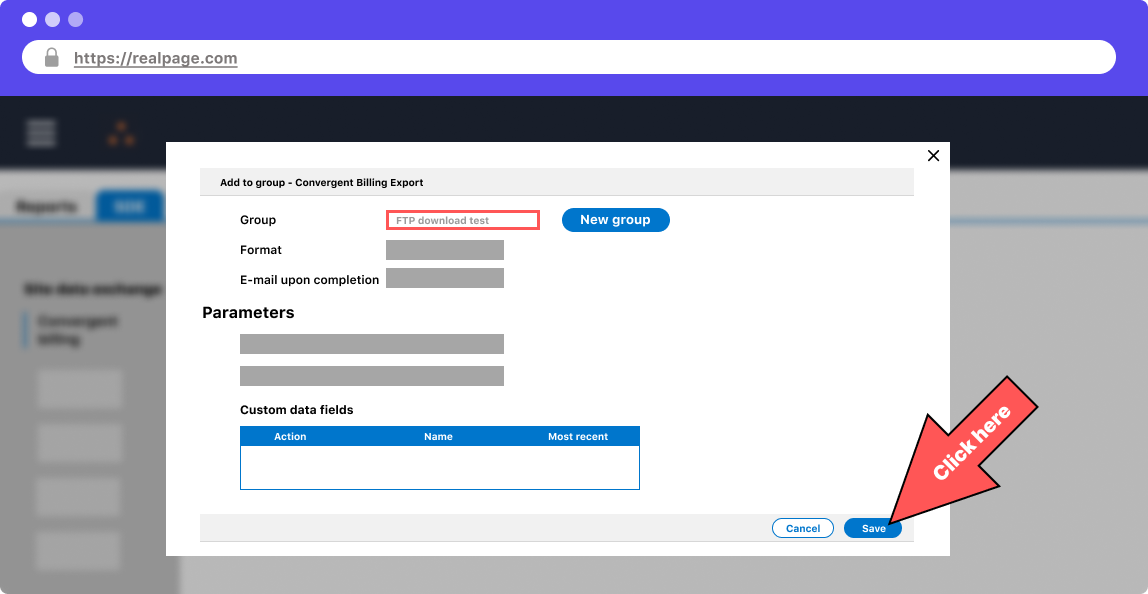
For the group to download, choose the one you made earlier for dealing with creating the convergent billing export.
-
Step 27
To test, you can change the FTP download group's schedule to be “On Demand” and select the “Generate Now” button at the top of the group. This should put the document into your FTP server. Once you're finished, put your schedule back to the desired frequency.